VPN
Introduction
This document describes a small (up to 253 node) server configuration wireguard network. Throughout a wireguard network IP is referred to as a.a.a.0/24, a typical node as a.a.a.x (x is replaced with another letter if it’s necessary to distinguish between nodes).
The servers public key is referred to as
sssssssssssssssssssssssssssssssssssssssss= and the servers public ip
as s.s.s.s and port sssss.
A client’s public key is referred to using another single letter string
(e.g yyyyyyyyyyyyyyyyyyyyyyyyyyyyyyyyyyyyyyyyy=) and it’s public ip and
port using the same letter (e.g y.y.y.y and yyyyy).
Server
Using wireguard in a server configuration, clients simply have the server in the
Peer section. The server has all clients in the Peer section. All
communications are inniated through the server.
Below is an example salt configuration (e.g. /srv/pillar/sites/my-vpn.sls) for a vpn server with 2 peers that also acts as a DNS server for the wireguard network (this is a very simplified example you may also want to add forwarders and allowed_ips etc.)
A node’s public key and IP Address needs to be added to the vpn section
but the ip address only needs to be added to the dns section if it needs
to be looked up, in this example only the server and the DNS/VPN server
can be looked up.
Add the IP address to the dns, zones and vpn sections e.g for a
network with 3 nodes:
- vpn server with an ip of a.a.a.1 (e.g. 10.10.10.1),
- a server with ip of a.a.a.11
- and a client with a.a.a.101
server_meta:
  dns:
    zones:
      - name: db.my.lan
        serial 1
        zone: my.lan
        primary_server: ns.my.lan
        email_address: root.my.lan
        entries:
          - { name: '',      type: A,    value: a.a.a.1 }
          - { name: '@',     type: NS,   value: ns.my.lan }
          - { name: '@',     type: A,    value: a.a.a.1 }
          - { name: server,  type: A,    value: a.a.a.11 }

  vpn:
    interface: wgx
    conf:
      Address: a.a.a.1
      PrivateKey: SSSSSSSSSSSSSSSSSSSSSSSSSSSSSSSSSSSSSSSSSSS=
      ListenPort: sssss
      DNS: a.a.a.1
    peers:
      server:
        PublicKey: yyyyyyyyyyyyyyyyyyyyyyyyyyyyyyyyyyyyyyyyyy=
        AllowedIPs: a.a.a.11/32
      client:
        PublicKey: zzzzzzzzzzzzzzzzzzzzzzzzzzzzzzzzzzzzzzzzzz=
        AllowedIPs: a.a.a.101/32
Once the configuration for the node is added the salt state needs to be applied to the vpn server…
Client (Linux)
We’ve written a private script that installs salt configuration management and
wireguard packages and creates a wireguard configuration for our vpn.
Internally we use this salt-minion-setup script to allow linux nodes to
request to be part of our configuration management and internal vpn. These then
need to be accepted on the salt master and added to the piller configuration
file (see above) for the vpn servers and the state applied to it:
The
salt-minion-setupscript creates the private and public keys on the client and displays the peer information to be added to the server on the screen this can then be cut and pasted into thesites/my-vpn.slsin the pillar file on the Salt master.Apply the states.
Restart the interface (
wg-quick down wg0 && wg-quick up wg0).
Tip
Don’t forget to setup the Wireguard - Configuration
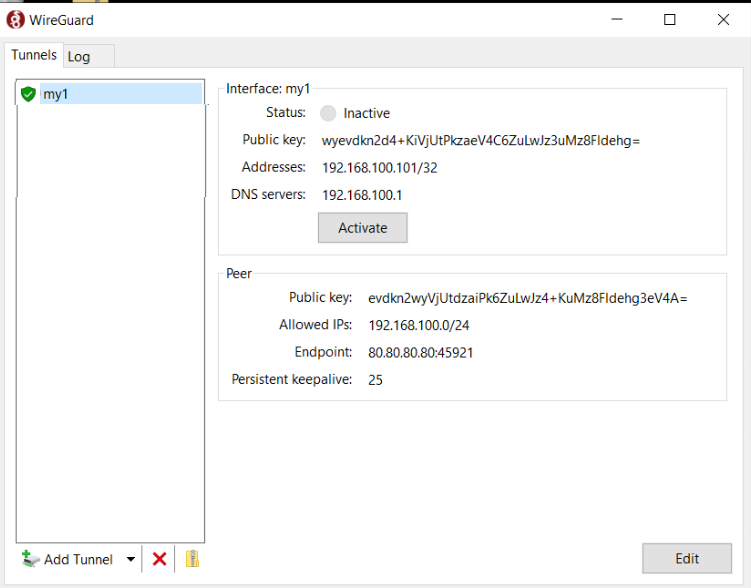
Client (Windows)
Download and install Wireguard https://www.wireguard.com/install/
Log in as an administrator and Create a new connection (Add empty tunnel) This will create an ini file with a public and private key. Alternatively the configuration file could be created on a separate server and imported.
- Using either method your configuration should contain the following directives
[Interface] PrivateKey = CCCCCCCCCCCCCCCCCCCCCCCCCCCCCCCCCCCCCCCCCCC= Address = a.a.a.<Free node number>/32 DNS = a.a.a.1
[Peer] PublicKey = sssssssssssssssssssssssssssssssssssssssssssssss= AllowedIPs = a.a.a.0/24 Endpoint = vpn-my.hatherleigh.info:sssss PersistentKeepalive = 25

Save and Activate
The Public key and IP address need to be added to your Salt pillar for your VPN server and the states applied.
Troubleshooting
Connection issues
To diagnose connection issues use (on both the client and the server):
sudo wg show
or if the interface is configured to start at boot time (assuming
interface is called wg0) use:
sudo systemctl wg-quick@wg0 status
e.g a typical client will show:
interface: wgx
  public key: yyyyyyyyyyyyyyyyyyyyyyyyyyyyyyyyyyyyyyyyyyy=
  private key: (hidden)
  listening port: yyyyy

peer: sssssssssssssssssssssssssssssssssssssssssss=
  endpoint: s.s.s.s:sssss
  allowed ips: a.a.a.0/24
  latest handshake: 20 seconds ago
  transfer: 46.90 MiB received, 523.78 MiB sent
  persistent keepalive: every 25 seconds
A typical server will show:
interface: wgx
  public key: sssssssssssssssssssssssssssssssssssssssssss=
  private key: (hidden)
  listening port: sssss

peer: yyyyyyyyyyyyyyyyyyyyyyyyyyyyyyyyyyyyyyyyyyy=
  endpoint: y.y.y.y:yyyyy
  allowed ips: a.a.a.x/32
  latest handshake: 1 second ago
  transfer: 2.37 GiB received, 964.48 MiB sent

peer: zzzzzzzzzzzzzzzzzzzzzzzzzzzzzzzzzzzzzzzzzzz=
  endpoint: z.z.z.z:zzzzz
  allowed ips: a.a.a.z/32
  latest handshake: 3 seconds ago
  transfer: 28.27 MiB received, 20.33 MiB sent

peer: wwwwwwwwwwwwwwwwwwwwwwwwwwwwwwwwwwwwwwwwwww=
  allowed ips: a.a.a.w/32
Lines to look out for in this output are:
- If there are no ``latest handshake`` or ``transfer lines`` (e.g peer
  wwwwwwwwwwwwwwwwwwwwwwwwwwwwwwwwwwwwww= above) this indicates the peer has
  not been seen since the service started.

- If the interface has been started recently a ``transfer`` line showing
  ``0B received`` indicates that the service is not connected.  This is
  usually due to a configuration issue.

- ``latest handshake`` should be less than a few minutes. if the transfer
  line shows a value for bytes received this indicates the configuration
  worked at some point so it may be a public network issue - the wireguard
  interface sends encrypted traffic over the public network imnterface.
Reset the interface
To reset a the wireguard interface (assuming it’s called wg0) use:
wg-quick wg0 down && wg-quick wg0 up
If the interface is started at boot time you can also use:
sudo systemctl restart wg-quick@wg0
From investigate the issue with why the VPNs were not working
Configuration issues
The PublicKey in the Peer section of the client configuration is the
public key of the server, not the client:
[Peer]
PublicKey = sssssssssssssssssssssssssssssssssssssssssss=
DNS
If you only have a single wireguard network and have a DNS server configured to resolve the nodes on a wireguard network, you can configure nodes to use this with the DNS directive in the wireguard configuration file. e.g.
DNS = a.a.a.x
If your system is configured to start the VPN network at boot rebooting may
resolve DNS issues or you can simply reset the interface as described above.
Tip
To check your name server information on ubuntu 20.04 and later use
resolvectl status.
Unstable connection
Check to make sure you are not using the configuration in two (or more) places!
Wireguard identifies a node using the public key. The server is able to route
to the node using the AllowedIPs = a.a.a.x/32 directive for the peer in the
server configuration file. If two nodes have the same IP or public key they
will constantly break each other.
Firewall Rules
A server protected by a firewall (recommended) needs a rule for it’s port to allow traffic.
A client with PersistentKeepalive directive only needs a firewall rules if
the output chain is restricted (for iptables, check using sudo iptables -L).